Homemade Pie Crust | Bake Like a Pro

Discover how to make your own homemade pie crust with this simple recipe. Making pies used to be scary, but not anymore!
This easy homemade pie crust with oil recipe is super flaky, and believe it or not, it is actually healthier by using avocado oil instead of shortening.
Easy Homemade Pie Crust Recipe
I wanted a homemade pie crust recipe with oil instead of one that called for shortening. Using a healthy oil makes for a more nutritious crust.
Anything that makes dessert a little healthier is a big benefit in my book!

Pie Crust Recipe
I wanted a flaky pie crust that was easy to make and easy to handle.
Plus, I wanted a pie crust recipe that did not use shortening. A pie crust made with oil was the answer. This deliciously easy recipe is actually healthy and is totally vegan!
So, this recipe checks all the boxes!
If you have always wanted an easy recipe for pie crust, an all-oil pie crust recipe, or a completely vegan pie crust recipe, then this is it!
I like this recipe with oil better than recipes that call for butter. This is because butter adds a large amount of saturated fats, while the avocado oil offers heart-healthy monosaturated fats.
In case you are wondering about using coconut oil, this recipe with avocado oil is so much easier to make, as it holds together better and is easier to work with.
Avocado is still my first choice for all my pie crusts! Interestingly enough, avocado is also my favorite oil for seasoning cast iron skillets and cookware.
This homemade oil pie crust recipe does not have any difficult steps. But, as you know now… the secret is using oil and rolling out the crust between waxed paper.
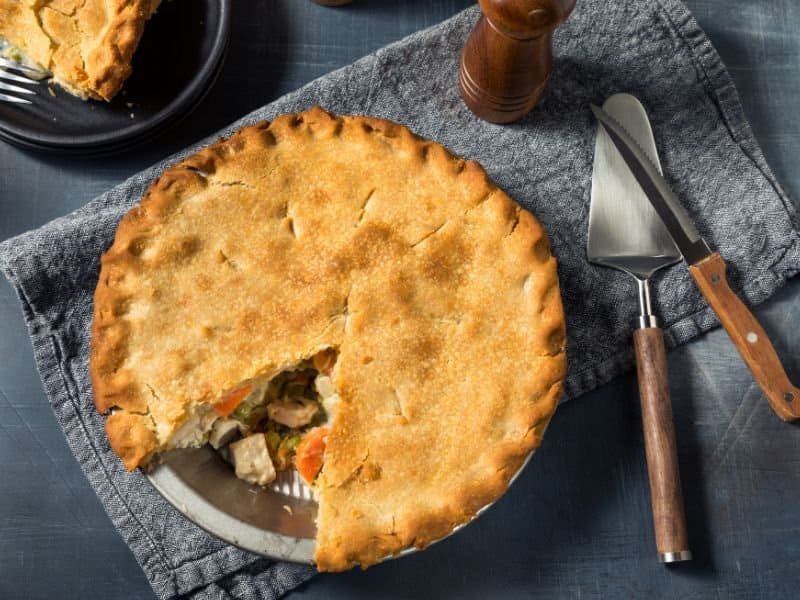
Please Note: this recipe makes the perfect flaky pie crust for homemade pumpkin pie, berry pies, apple pies, and cream pies.
Plus, this recipe is also the perfect choice for sweet or savory pies and quiche! .
RECIPE and TUTORIAL with PHOTOS:
The secret is to roll the pie crust between waxed paper!
I have lots of pictures for each step, so you’ll feel confident making this homemade pie dough on your own!
Making pie dough is a fun and rewarding kitchen project. With clear instructions and visuals, you’ll be on your way to making your own delicious (& healthier) pastry crusts!
#01 INGREDIENT LIST for Single and Double Crust Pies:
List of Ingredients for a Single 9-inch Crust:
Ingredients you’ll need for this recipe
List of Ingredients for a Double 9-inch Crust:
Ingredients you’ll need for this recipe
#02 COMBINE INGREDIENTS
- Create a pebble-sized, crumbly mixture by combining flour, oil, and salt.
- Begin adding water, starting with two tablespoons, adding just enough until the dough binds together and does not stick to the sides of the bowl.
- Make sure the dough is easy to work with but not sticky or dry. Add water sparingly if needed, one additional teaspoon at a time.
- The dough should be nice to handle. It should be pliable, but not crumbly, and definitely not sticky.
- Making pie crusts can be tricky at first, but don’t worry! With practice, you’ll get the hang of it. Just keep trying, and soon enough, you’ll feel comfortable working with dough.
Follow the Photos to Create the Best Pie Crust Ever
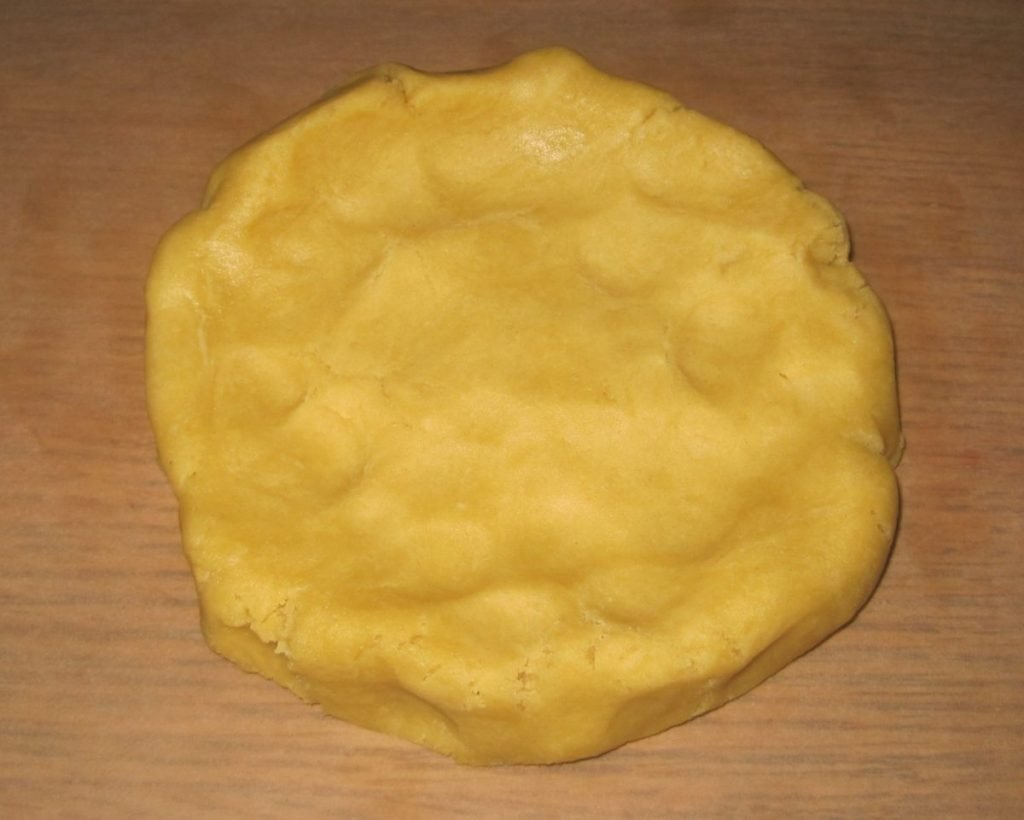
Pat ouT Pastry Dough 
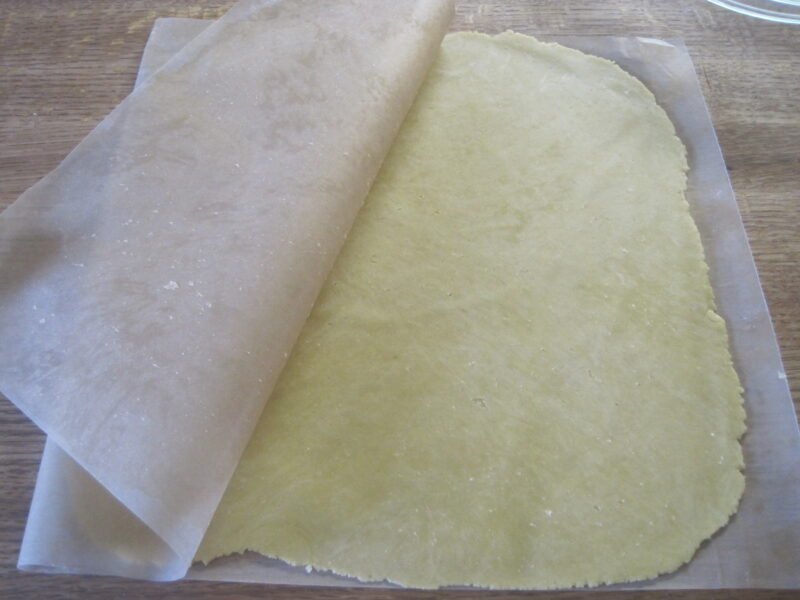
rolling Out in Wax Paper 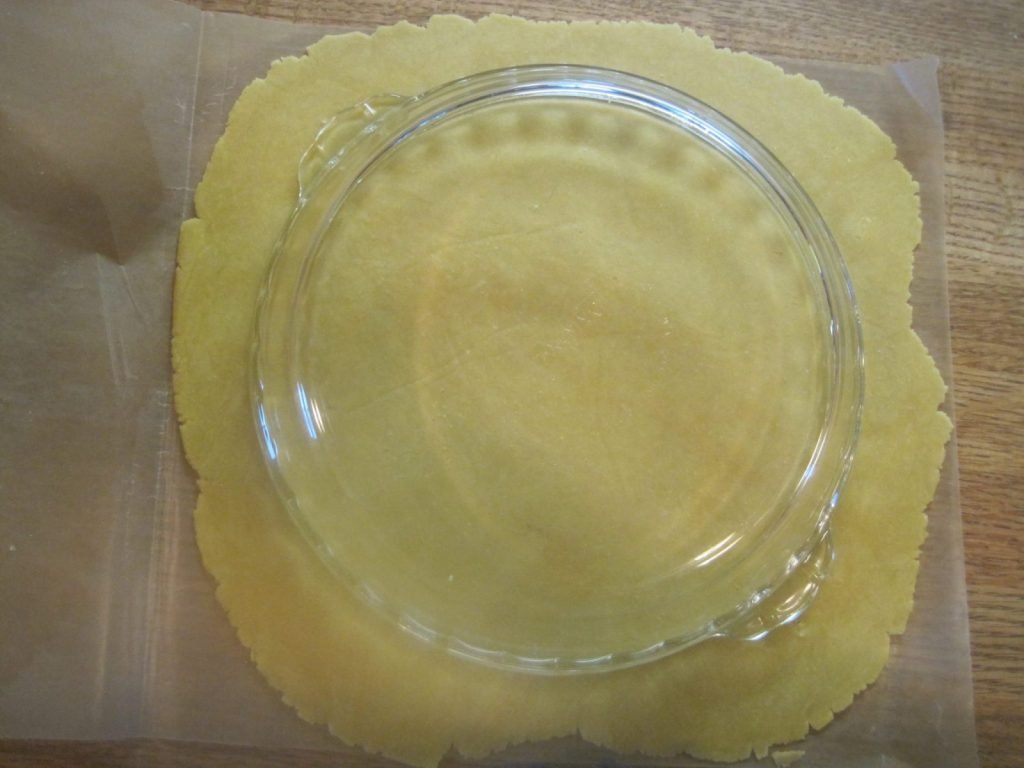
measure with pie plate
#03 ROLLING OUT DOUGH:
- Cut off a 18″ piece of waxed paper. Fold the waxed in half. Gather your pastry dough and place it in the middle of your waxed paper on your bread board.
- Gently press your pastry dough into a flattened circle. Fold the top piece of wax paper over your dough.
- Gently use your rolling pin to roll your dough, starting from the middle and working your way to the outside. You want to gently push and move the dough to the outer edges of the wax paper.
- Try to push the dough with outward rolling movements instead of simply rolling back and forth. You need to handle the pastry dough carefully.
- As the dough is being rolled out, the wax paper may wrinkle a bit. If this happens, simply lift the wax paper up and reposition it over the top of the dough.
- Flip the dough over and roll on the other side, too. You are trying to push the dough to the outer edges of the wax paper without tearing the dough or the paper.
- This takes a little practice, but you will come to understand what works best while you are working your pastry dough.
And, then carefully move your pie crust to the pie plate
remove waxed paper 
move pastry in pie plat 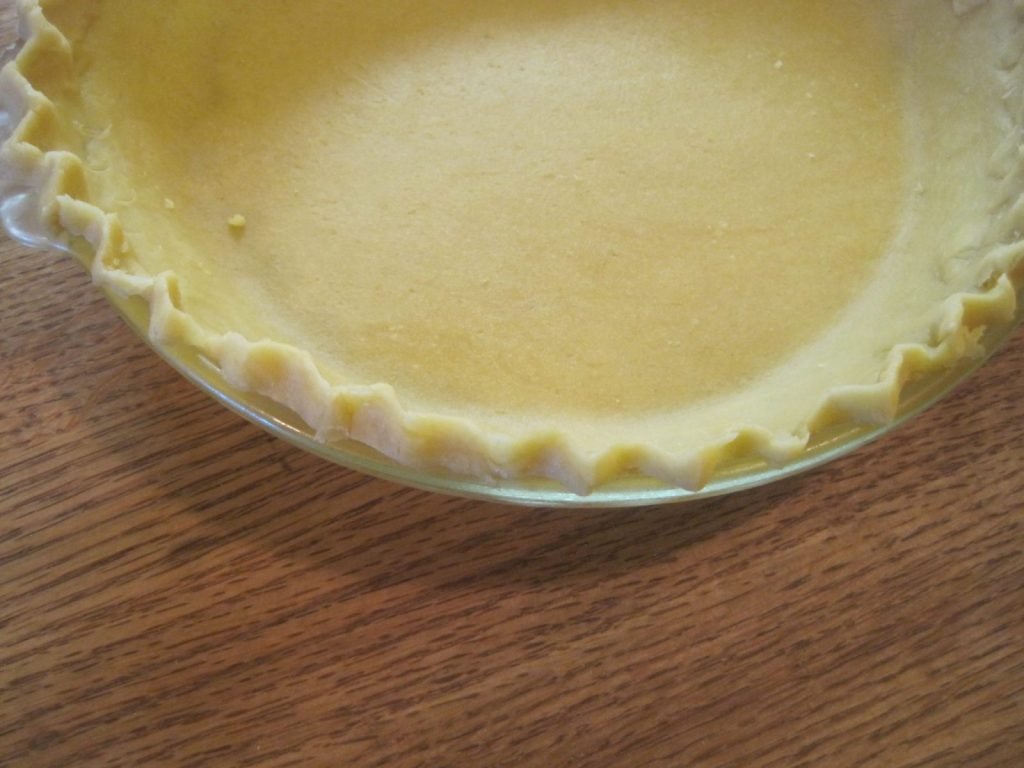
flute pie crust edges
#04 MOVE PASTRY DOUGH TO PIE PLATE:
- Once your pastry dough is the size to fit your pie plate, carefully lift the wax paper off the top side and lay it back down.
- Then, flip the whole thing over and lift the wax paper off the other side.
- Flip it back and lift the wax paper off the dough. Now, get ready to flip the dough over your pie plate right in the center.
- Take your time and carefully flip the pie crust into your pie pan.
- Try to keep it centered. Make sure to watch the photo gallery on how to do this.
- If you experience any tears or rips in your crust, just wait until the pastry dough is in the pie plate. You can gently make repairs by dampening your fingertips and patting the torn area back together.
- Finally, using your fingers, flute the edge of your pie crust.
- Make sure to watch the video, as it shows the steps to make a perfectly fluted pie crust edge.

#05 BAKING INSTRUCTIONS for Different Type Pies:
Learn how to make pie crusts for single and double crust pies as well as for baked pie shells for custard and chilled pies.
Single Crust Baked Pie Shell
Baked Pie Shell for Chilled Custard & Cream Pies
- Follow all the instructions for the single pie crust recipe above.
- Using your fingers, flute the edge of your pie crust before baking.
- Make sure to watch the video, as it shows the steps to make a perfectly fluted pie crust edge.
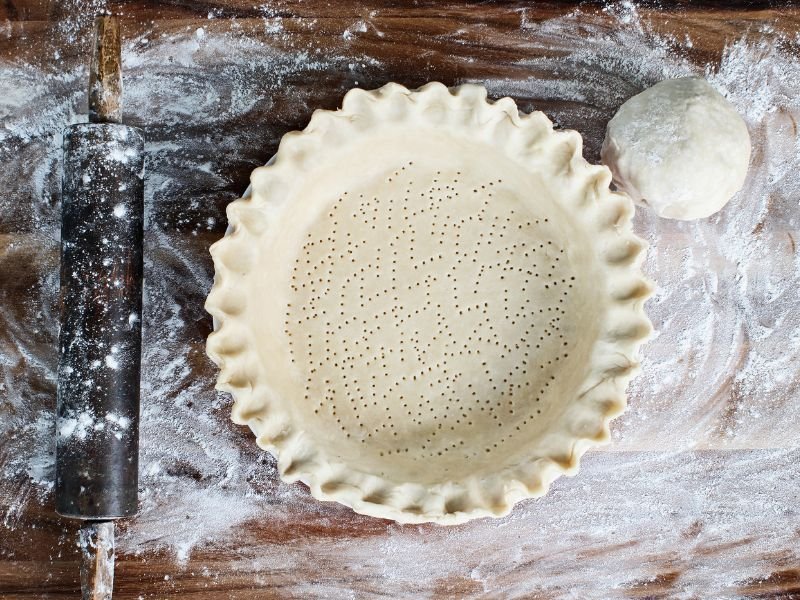
- After fluting the edges of your crust in the pie pan, prick the bottoms and sides of your crust with a fork. Prick it all over. This helps eliminate any bubbles while baking.
- You must bake your crust prior to adding your cream filling.
- Bake your pie crust in a 400-degree oven for approximately 14 minutes. Watch the baking time so the crust does not burn.
- Cool the baked pie crust completely and then fill it with your prepared cream or pudding filling.
Single Crust for Baked Custard, Pumpkin Pies and Quiche
- Follow all the instructions for the single pie crust recipe above.
- Using your fingers, flute the edge of your pie crust before baking.
- Make sure to watch the video, as it shows the steps to make a perfectly fluted pie crust edge.
- For custard or pumpkin pie: Do not pre-bake your pie crusts. Prepare your filling and pour it into your pie crust. Bake as directed.
- Follow your pie filling baking recommendations or bake at 350° for approximately 45 to 55 minutes.
- Watch the baking time so the crust does not get too dark in color.
DOUBLE Crust Pie Shell for baked Apple or Berry Pies
- Follow all the instructions for the double pie crust recipe above.
- For any two-crust recipe, you will need to roll out your bottom crust first and put it in your pie pan. Repair any tears.
- Next, add the filling in the bottom crus.t.
- Then, roll out the top crust in the same manner. Place this top crust over the filling and seal the edges. Folding and pinch the top and bottom edges of the dough together. Dampen your fingers if necessary.
- Repair any tears and flute the edges.
- Follow your pie filling baking recommendations or bake at 350° for approximately 45 to 55 minutes.
- Watch the baking time so the crust does not get too dark in color.
All Oil Pie Crust Recipe for 2 Crusts

Easy Oil Pie Crust that turns out perfect every time!
Ingredients
- 2 1/4 cups Unbleached Flour
- 10 tablespoons Avocado Oil - (this is 1/2 cup oil + 2 tablespoons)
- 1/2 teaspoon of Pink Himalayan Salt (you may use any mineral salt or white salt)
- Approximately 1/4 cup of water
- For a ONE CRUST PIE - See the ingredient amounts listed below in the NOTES Section.
Instructions
COMBINE INGREDIENTS:
- Combine flour, oil and salt in a small bowl until the mixture is crumbly. The particles will be the size of a pea. Next, add 2 tablespoons of water and mix until dough sticks together and easily comes clean from the side of your bowl.
- The dough should be easy to handle and moist. It should not be dry and crumbly and should not be sticky.
- If your dough seems dry, then add a little more water, one tablespoon at a time. Do not too much water or your ratio of flour to oil will be off. The dough should be nice to handle. It should be pliable, not crumbly and not sticky.
- It might take a few times of making your pie crusts to get the feel of the dough but it will come with practice.
ROLLING OUT DOUGH:
- Cut off a 18″ piece of waxed paper. Fold the waxed in half. Gather your pastry dough and place in the middle of your waxed paper on your bread board. Gently press your pastry dough into a flattened circle. Fold the top piece of wax paper over your dough.
- Gently use your rolling pin to roll your dough, starting from the middle and working your way to outside. You want to gently push and move the dough to the outer edges of the wax paper.
- Try to push the dough with outwards rolling movements instead of simply rolling back and forth. You need to handle the pastry dough carefully.
- As the dough is being rolled out, the wax paper may wrinkle a bit. If this happens, simply lift the wax paper up and re-position it over the top of the dough.
- I flip the dough over and roll on the other side, too. You are trying to push the dough to the outer edges of the wax paper without tearing the dough or the paper.
- This takes a little practice but you will understand while you are working your pastry dough.
MOVING PASTRY DOUGH TO PIE PLATE:
- Once your pastry dough is the size to fit your pie plate, carefully lift the wax paper off the top side and lay it back down. Then, flip the whole thing over, dough and wax paper and lift the wax paper off the other size.
- Flip it back and lift the wax paper off the dough. Now, get ready to flip the dough over you pie plate right in the center. Take your time and carefully flip the pie crust into your pie pan.
- Try to keep it centered. Make sure to watch the photo gallery for an idea of how to do this.
ONE CRUST PIE with CHILLED PUDDING or CREAM FILLING ~ Pre-bake Crust
- Single pie crusts must be baked prior to adding your filling.
- After rolling out the crust and putting it into the pie pan, prick the bottoms and sides of your crust with a fork.
- Prick it all over. This helps eliminate any bubbles while baking.
- Bake your pie crust in a 400 degree oven for approximately 14 minutes.
- Watch the baking time so the crust does not burn.
SINGLE PIE CRUST RECIPE for Baked Custard or Pumpkin Pies
- For BAKED CUSTARD or PUMPKIN FILLING: prepare your filling and pour into your unbaked pie crust.
- Follow your pie filling baking recommendations or bake at 350° for approximately 45 to 55 minutes or until filling has set up.
- Watch the baking time so the crust does not get too dark in color.
TWO CRUST RECIPES with Berries, Apples or other Fruits Pies with 2 a top & bottom crust;
- For any TWO CRUST PIE, you will need to roll out your bottom crust first.
- Next, add the filling in the bottom crust and then roll out the top crust in the same manner.
- Bake according to your filling recipe.
Notes
FOR 1 CRUST 9 INCH PIE:
1 and 1/4 cups Unbleached Flour
1/3 cup Avocado Oil
1/4 teaspoon of Pink Himalayan Salt (you may use any mineral salt or table salt)
Approximately 2 to 3 tablespoons of water
PROBLEMS:
If you experience any tears or rips in your crust just wait until the pastry dough is in the pie plate. You can gently make repairs at that point.
Nutrition Information
Yield
8Serving Size
1Amount Per Serving Calories 265Total Fat 17gSaturated Fat 2gTrans Fat 0gUnsaturated Fat 15gCholesterol 0mgSodium 98mgCarbohydrates 24gFiber 1gSugar 0gProtein 3g
Nutrition information isn’t always accurate due to variations of ingredients used in recipe.
Related Post: My friend Victoria at A Modern Homestead has a wonderful post on How to Can Cherries for Pie!

Imagine credit and tutorial found at A Modern Homestead
Here is a wonderful heritage recipe for Granny’s Cocoa Cream Pie Filling from my friend, Abby, at Forgotten Way Farms:

IMAGE CREDIT & TUTORIAL FOUND AT FORGOTTEN WAY FARMS


Valuable information. Fortunate me I discovered your website by chance, and I’m shocked why this twist of fate did not took place earlier! I bookmarked it.
Thank you for your kind words…..I am so pleased that you found my blog of interest and helpful!
I made the pie crust and it was great. Crumbly and perfect. I used avocado oil. Wondering if you have the portions for a recipe with a larger pie pan.. 10″ deep dish? Thank you in advance. Love your site.
What temp and baking time should I use for two crust pie?
Hi Luci……thanks for mentioning this missing information!!! You should follow your pie filling baking recommendations or you can bake your pie at 350° for approximately 50 to 60 minutes or until the fruit is soft. Appreciate you writing! PS-I updated that information in my post. 🙂
Awesome Pie Crust…..I enjoy wholesome tasting foods and this pie crust hits the spot! Thanks for the great recipe!
This pie crust recipe opens up a whole world for me. I can only tolerate avocado oil and of course had to give up pie crusts long ago. I’ve made two quiches this week with your recipe and LOVE it. Thank you so much for posting it!