LEARN to MAKE HOMEMADE MILK KEFIR | A Probiotic Rich Drink

Milk kefir is a wonder drink loaded with healthy probiotics…. Learn how easy it is to make homemade kefir.
Many cultures worldwide value and respect cultured milk and water kefir for their health-giving benefits. Kefir is often considered a perfect food to add to your daily diet, but it is expensive if you must buy it from the health food section of your local grocery store.
Homemade Milk Kefir
Kefir has healthy probiotics that help with digestion and support a strong immune system. Many lactose-intolerant people can enjoy milk kefir because the bacteria in it breaks down lactose.
Learn how to make milk kefir at home! These beneficial bacteria also stop harmful bacteria from growing in the milk.
Make Homemade Milk Kefir + Second Fermentation
First, get milk kefir grains. These grains are soft, white, and look like small pieces of cauliflower, not like wheat or oats.
You can buy kefir grains online, but it’s better to find them locally. The best option is to get them from a friend since they keep growing and producing more grains.
Once you have your fresh kefir grains, follow the steps below…
How to Make Milk Kefir from Grains
INSTRUCTIONS:
- When you get your kefir grains, rinse them in cold water using a fine mesh strainer and non-chlorinated water.
- Put the grains in a clean jar and add about 1 cup of fresh milk. I use raw goat’s milk, but organic cow’s milk works, too.
- Cover the jar with a lid or a clean cotton cloth or paper towel and secure it with a rubber band. Place the jar on your kitchen counter and leave it for at least 24 hours.
- Check for thickening milk. Stir it a couple of times a day or swish the jar gently.
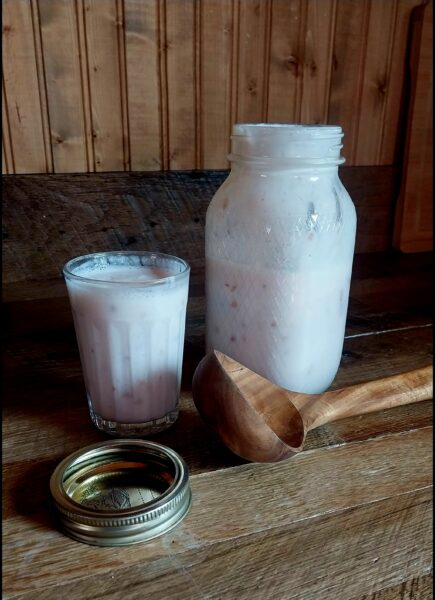
- The kefir should be ready in about 24 hours, depending on your kitchen’s temperature. The milk will thicken slightly and taste fresh and tart, similar to cultured buttermilk. If it separates into curds and whey, it’s still okay—just stir it back together and strain it. This over-cultured kefir may taste more sour, so consider using it in cooking.
- Strain the kefir mixture through a fine-mesh strainer into a 4-cup measuring cup. Pour the kefir back and forth through the strainer to get all the goodness off the grains. Remember to save your new grains in the strainer for the next batch!
- Rinse the new kefir grains under cold water (never warm or hot) while still in the strainer to start the process again. Some people skip rinsing, but I find it helpful, especially when using raw milk. After rinsing, you’ll see healthy, creamy white grains that look like large-curd cottage cheese or small cauliflowers—that’s what you want.
- Now, you can start the process again by placing your freshly strained and rinsed kefir grains into a clean jar with fresh milk.
If you have extra kefir grains, you can eat them or share them with friends and neighbors so they can make their own kefir.
If you find kefir too sour, you can add some sugar, jam, or fruit to make it sweeter. Enjoy!

Milk kefir grains may also be chewed or swallowed whole. The grains are soft and pliable.
These may be chewed or swallowed whole. The grains are soft and pliable.
I have also found that our dogs, cats and chickens love these homemade kefir grains as well as the liquid kefir.
Feed them some when you have extra. The more grains that you have in your milk, the faster your kefir will make.
Each individual milk kefir grain will multiply on its own; you may slow the process by removing some of the grains and either eating them yourself or feeding some to your animals or by increasing the amount of milk that you use.

RECIPES NOTES:
Be patient with yourself as you start making homemade milk kefir.
Milk Kefir Benefits: I used to purchase probiotic supplements but do not need to anymore, as the kefir provides fresh probiotics. I love the idea of providing our daily needs with simple foods!
Kefir is rich in these essential probiotics as well as other nutrients. Find books about other uses for kefir, like making cheese and cream cheese spreads.
Consider adding fresh fruit to your kefir for an exceptionally refreshing and healthy treat.


Always save your kefir grains for the next batch. Start the new batch while you strain the first one!

If you have extra kefir grains, you can eat them or give them to friends and neighbors to make their own kefir.
If you are wondering if you can eat kefir grains, the answer is yes! So, if a family member doesn’t like the taste of kefir, they can still get the amazing probiotic benefit from simply eating a kefir grain or two. That is a very simple solution!
PRINTABLE RECIPES:
Simple Instructions for Making Milk Kefir

Homemade Probiotic Rich Dairy Drink
Ingredients
- 1 cup Milk Cow or Goat Milk (full fat milk product)
- 1 to 2 tbsp Milk Kefir Grains
Instructions
- When you get your kefir grains, rinse them in cold water using a fine mesh strainer and non-chlorinated water.
- Put the grains in a clean jar and add about 1 cup of fresh milk. I use raw goat’s milk, but organic cow’s milk works, too.
- Cover the jar with a lid or a clean cotton cloth or paper towel and secure it with a rubber band. Place the jar on your kitchen counter and leave it for at least 24 hours.
- Check for thickening milk. Stir it a couple of times a day or swish the jar gently.
- The kefir should be ready in about 24 hours, depending on your kitchen's temperature. The milk will thicken slightly and taste fresh and tart, similar to cultured buttermilk. If it separates into curds and whey, it's still okay—just stir it back together and strain it. This over-cultured kefir may taste more sour, so consider using it in cooking.
- Strain the kefir mixture through a fine-mesh strainer into a 4-cup measuring cup. Pour the kefir back and forth through the strainer to get all the goodness off the grains. Remember to save your new grains in the strainer for the next batch!
- Rinse the new kefir grains under cold water (never warm or hot) while still in the strainer to start the process again. Some people skip rinsing, but I find it helpful, especially when using raw milk. After rinsing, you’ll see healthy, creamy white grains that look like large-curd cottage cheese or small cauliflowers—that's what you want.
- Now, you can start the process again by placing your freshly strained and rinsed kefir grains into a clean jar with fresh milk.
Notes
As a side note……
Please realize as you continue to make kefir your grains will multiply.
Remember to use your kefir in fruit smoothies.
If you have too many kefir grains, you may simply eat them or give some away to friends and neighbors so they can begin making their own kefir.
My husband does not care for the taste of kefir even in fruit smoothies but knowing the benefits of kefir; he will simply eat a few grains a day. These may be chewed or swallowed whole. The grains are soft and pliable.
I have also found that our dogs, cats and chickens love these grains as well as the liquid kefir. Feed them some when you have extra.
The more grains that you have in your milk, the faster your kefir will make. Your kefir grains will multiply on their own; you may slow the process by removing some of the grains and either eating them yourself or feeding some to your animals or by increasing the amount of milk that you use.
Your milk kefir is ready to drink or use plain but consider adding strawberries, raspberries, blueberries or blackberries and allow a second fermentation to take place.
Milk Kefir Second
Fermentation: This is an easy step. Simply place 2 cups +/- of fresh milk kefir in a clean quart jar.
Add 1/2 to 1 cup of fresh or frozen berries to the jar.
Allow the jar to sit at room temperature for 4 to 6 hours and then refrigerator.
This second fermentation goes much quicker than the first fermentation. Y
ou will be able to see the milk kefir take on a slightly frothy appearance.
Swirl the jar every once in a while to mix the berries with the milk kefir
This second fermentation is ready within a few hours. If it is too tart, add a little cane sugar to taste and Enjoy!
Additional Information
Please be patient with yourself as you embark on the adventure of Kefir Making. Just as a side note.......I used to purchase probiotic supplements but do not need to anymore as the kefir provides these.
I love the idea of providing our daily needs with simple foods! Kefir is rich in these essential probiotics as well as other nutrients. Look for books on all the other things that can be done with Kefir: i.e. cheese, cream cheese type spreads, etc.
Consider adding fresh fruit to your kefir for an exceptionally refreshing and healthy beverage! But, always remember to save your kefir grains for the next batch.......start the next batch as you are straining the first batch!
Nutrition Information
Yield
1Serving Size
1Amount Per Serving Calories 140Total Fat 8gSaturated Fat 6gTrans Fat 0gCholesterol 35mgSodium 120mgCarbohydrates 10gFiber 0gSugar 12gProtein 8g
Nutrition information isn’t always accurate due to variations in the ingredients used.
Additional Important Info:
If your milk kefir separates, simply pour it back and forth through your mesh strainer. It will blend back to a rich creamy mixture.
Freshly strained kefir milk makes a refreshingly light drink. At this point, the kefir is ready…tart but tasty. I usually blend in some frozen berry puree or even some type berry fruit spread. You may add a little sugar if you like. Experiment a bit to find what works best for you.
Fresh fruit may also be added plus a little raw sugar if the taste is too tart for your liking. Any type of fruit may be used.
I love adding either fresh or frozen strawberries, raspberries, bananas, blueberries, or pomegranate seeds… Use your imagination!


Fruit puree works well. Just add enough to flavor the milk kefir and let it ferment for a few more hours. You can also blend whole fruits in a small blender and mix them into the kefir jar for a smoother texture.
Finally:
In conclusion, making homemade kefir is a satisfying process and a great way to add probiotics to your diet. Remember to try different flavors by adding various fruits and berries to enhance your kefir flavor and nutritional value. Start your kefir journey today and enjoy its many health benefits!


Is it true what I heard that kefir differs from any other fermentation in the fact that its mother culture/starter will always spread itself into the entire liquid, so even if you redo the process dozens of times the beginner culture physical properties will be still present, different is for instance, using sourdough culture of rye into a spelt dough, after redoing the process numbers of times, lab test wont find anymore traces of the rye”?
Yes, this is my understanding, too. I use the exact same milk kefir grains over and over again. I add milk kefir grains to fresh milk. Once the kefir has fermented, I rinse these grains and add them to a new batch of milk to start the exact same process over again. This holds true for water kefir grains as well. So, in essence, the kefir grains ferment the milk or water but do not become the fermented product; they maintain their complex structure. Thanks for pointing out this interesting information about kefir grains.