Mulch for Gardening Success: Best Garden Mulch
Are you thinking about using mulch for your garden? Mulching makes gardening easier by keeping soil moist and reducing weeds. We’ve learned a lot about how mulch helps gardens thrive and that mulching for garden success is a winner!
Many people use the “Back to Eden” method, which involves mulching with wood chips from whole trees, limbs, and branches to create Ramial Wood Chips. This video explains why it’s important to protect and enrich the soil to grow healthy fruits and vegetables.
It also shows how easy gardening can be when you use mulch. When you create the right environment for soil nutrients and moisture, your plants will grow better.
Mulch for Gardening Success
We live in a rural area, so we can’t get tree branch mulch. We decided to buy a chipper/shredder to make our own mulch.
We bought a Chipper Shredder for our garden, and it works really well! So far, so good, we had a great experience with this chipper shredder so we recommend it.

Having our own chipper shredder also enabled us to do extensive yard and land cleanup by chipping all the extra limbs, branches, and small trees that we have been clearing out.
We have used our Brush Master chipper for many hours, and it still runs well. The chipper blades need to be sharpened periodically as listed in the instructions. Just remove the blades as indicated and sharpen as needed.
Rent or Buy a Wood Chipper
You might find wood chips nearby, but if not, consider buying a chipper/shredder for your homestead. You can also earn money by renting out your chipper. It’s best to operate the chipper yourself when renting it out.
Here is a load of small green trees, branches, and limbs with leaves that we started chipping. Always wear ear and eye protection when using the chipper/shredder.

We made a wooden bin and a small ramp to hold the ramial wood chips.
The Chipper Shredder has a bag for collecting wood chips, but since we had many trees, limbs, and branches, we thought a wooden bin would be better. This close-up photo shows the ramial wood chips. You can see the green leaves and stems mixed in with the bark.

We then loaded the ramial wood chips into a wheelbarrow and spread them throughout the garden.
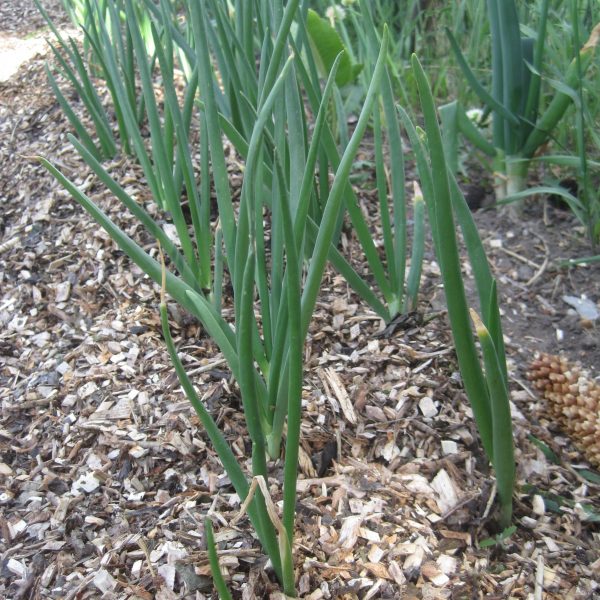
If we had heavy grass or turf to go over, we first spread a layer of newspaper or cardboard to help with weed suppression and then put down the wood chips. We spread the wood chips about 2″ to 3″ thick, as shown around our onion plants.
Pull the wood chips away to expose the dirt to ensure the seeds and bulbs are planted and covered with dirt. The soil needs to “breathe,” so do not make your mulch too thick. This is especially true with denser clay-type soils.
Special Note: Always make sure to plant your seeds, bulbs, or sets directly in the dirt. This is very important.
you may also find of interest
- Grass Mulching Benefits for a Healthier Lawn: But Why?
- Easy Guide to Compost vs Top Soil, Garden Soil, & Loam
- Seeds Not Sprouting Properly? Do a Germination Test
- Timeless Garden Quotes That Are Sure to Make You Smile

See the Back to Eden video link here: The Back to Eden Garden Mulch Video
The Backyard Homestead Seasonal Planner:
What to Do & When to Do It in the Garden, Orchard, Barn, Pasture & Equipment Shed


Here are the first potato plants peeking through the wood chips…If you have enough wood chips, spread some in the walkways to prevent mud. This will create nice pathways. You can really see how much more moisture is in the soil with wood chips compared to the walkways without them.

So the end results were impressive…We had some huge potatoes. Not all our spuds were this huge but we did have some that were quite noteworthy!!! This Hi-Rise Lifetime Sprinkler has been fantastic!

We have successfully grown Yukon Goldd, Blue Adirondack, Purple Majesty and Colorado Rose potatoes. Using mulch has many benefits for growing potatoes.
Mulch protects the soil, boosts soil organisms, encourages worm and creates a healthy environment for roots. This leads to strong garden growth.
Remember to use only green materials like leaves and green branches, not dead ones. We learned this the hard way when we used brown limbs and faced nitrogen problems, which caused some plants to grow poorly.
I added a natural Alaska Fish Emulsion Fertilizer 5-1-1 Concentrate 1 Gallon to improve nitrogen levels in the soil, and it made a big difference.
If you use dried wood chips or bark, make sure they are starting to decompose. If they aren’t decomposed, they will pull nitrogen from the soil, which can harm your plants.
Lesson Learned:
Consider your location if you choose the back-to-Eden method with Ramial wood chips. We live in a high desert area and didn’t think about this when we started.
The wood chips didn’t break down as quickly as we expected because our growing season is short and the area is semi-arid. However, making our own chips and mulch was still very helpful.
We used the wood chips in the garden and as mulch around plants and shrubs. They just took longer to decompose than we hoped.
Ramial wood chips work well in places with longer growing seasons where decay happens faster.
Various Materials for Mulching for Garden Success
Grass Clippings
Grass clippings are a popular and efficient mulching material for your lawn. These clippings break down quickly and provide your lawn with valuable nutrients.
Straw
Straw is a lightweight and easy-to-spread mulch for lawns and gardens. It insulates plant roots and helps maintain soil temperature. Be sure to use weed-free straw to avoid unwanted plants.
Wood Chips
Wood chips are a versatile and long-lasting mulch. They insulate soil, retain moisture, and suppress weeds, making them great for trees, shrubs, and flower beds. Aged or composted wood chips are best, as fresh ones can temporarily take nitrogen from the soil.
Cardboard
Cardboard is an eco-friendly mulch that suppresses weeds and retains moisture. Lay overlapping sheets in garden beds, leaving space for plants and watering. You can cover it with straw or grass clippings for a better look and faster decomposition.
Pine Needles
Pine needles, or pine straw, are lightweight and attractive for landscaping around trees and shrubs. They help insulate soil and retain moisture while allowing air and water to pass through. Replace them every 2 to 4 years. Keep an eye on soil acidity when using pine needles.
Mulching Tomatoes, Vegetables and Trees
Mulching your tomato and vegetable plants helps keep the soil healthy and retains moisture, which can lead to better harvests.
Tips for Mulching Tomatoes and Vegetables:
Use organic straw or grass clippings, for tomatoes on be a successful garden mulch. This keeps moisture in and regulates soil temperature, helping to avoid problems like blossom-end rot.
For other vegetables, choose organic mulch such as compost or well-rotted manure. This will enrich the soil over time.
When mulching, apply a layer that is a few inches deep to keep moisture in and prevent weeds.
Using grass mulch in your garden, trees, and vegetable plants creates a healthier environment and reduces maintenance later on.
Mulching for Trees
When mulching around trees, be sure to follow these guidelines to promote tree health:
Use organic mulch, such as wood chips or shredded bark, to help retain moisture and provide nutrients as it decomposes.
Apply the mulch around the tree’s base in a 2-4 inch layer, keeping a distance of at least 3 inches from the tree trunk to avoid rot and fungus issues.
Expand the mulched area outward, ideally covering as much of the tree’s root zone as possible.
Quick Tip for Free Earthworms:
After it rains, gather earthworms from the grass, sidewalk, or driveway and put them in your garden. They will start working for you right away.
If you don’t return them to the soil, birds may eat them, or they might die in the sun. Helping them back into the garden is a win-win! You’ll be surprised at how quickly they multiply!
Completely Suppress Weeds in Flower Beds:
To stop weeds in areas you’re not planting, consider using weed fabric covered with a light layer of mulch.
Only use Weed fabric in spots that won’t be tilled or planted regularly. It covers the soil completely but prevents mulch from breaking down and enriching the dirt beneath.
Gardener’s cloth has its uses but is not suitable for areas where you will plant or till vegetables.
That’s a Wrap…On Mulch for Gardening success
In conclusion, mulching is beneficial for your garden.


If direct sowing onion seeds, would you wait for the onions to sprout before recovering with mulch or would you plant the seeds and immediately recover with wood chips and let the greens push up through the wood chips?
In my experience, it is best to allow the seeds to sprout before pushing your mulch back into place. Just leave a narrow strip where you planted the seeds free of heavy mulch until they are 3 to 4 inches tall. The tiny seedlings are extremely tender so the woodchips or mulch can be pretty hard on them as they sprout. I would definitely wait to push the mulch back in place for your onion seeds. Plus, depending on the other variety of seeds planted, some seeds do not like being planted too deep. The mulch adds additional depth that is hard on some plant varieties. So, allowing the seedlings to get established is important before pushing the mulch back in place. As an added bonus, the mulch along each side of your rows will offer additional protection to your newly planted seeds by protecting them from wind as well as helping retain ground moisture. Best to you and your garden!