Farmhouse Kitchen Remodel Ideas | DIY Kitchen Cabinet Project

You can do so much to create an entirely new look with this farmhouse kitchen remodel project, which will give your old kitchen a rustic, elegant feel that is simple and clean.
Farmhouse Kitchen Remodel
Since kitchen cabinets are the most essential element of a kitchen, we will focus on how you can transform them for a rustic farmhouse vibe.
Mix and match other elements to complement your cabinets. You can also pick and choose the décor ideas according to your personal preference and budget.
Farmhouse Kitchens are back in fashion!
Farmhouse-style kitchen décor is all about authentic details, distressed surfaces, a spacious look, and elegant materials.
We have a number of simple DIY techniques that you can use to turn your existing kitchen into a farmhouse-style kitchen.
The main project was to upgrade the cabinet doors, plus we added beadboard backsplash, new countertops, and rustic lighting.
If a full-scale renovation is not possible, try our tried-and-tested DIY techniques to transform your kitchen.
You May Also Enjoy:
- Simple Homemade Fly Trap | DIY Project that Works!
- HAND KNIT DISH SCRUBBER: DIY Natural Scrubbie
- HEATING WITH WOOD: Top Tips for Your Woodstove
- How to Set a Mouse Trap for Simple & Easy Success
Quick Peek at Before and After Photos:

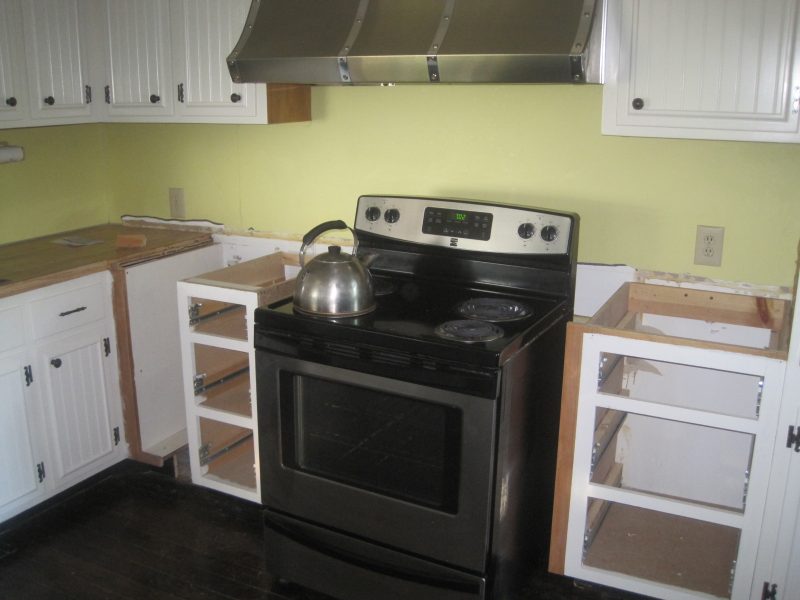
Our kitchen had old yellow Formica countertops and a backsplash. It was dark because it only had one north-facing window.
We wanted to brighten it up but were unsure about painting the maple cabinets since we never paint wood.
We have always appreciated the warmth of wood, but…
Deciding to paint our wooden cabinets was tough. Our cabinets were maple, and we usually never paint wood. We love wood and never considered painting them before.
Solid Wood or Veneer
But when we looked closer, we saw that the maple cabinets actually just had a thin maple veneer, so they basically were plywood cabinets.
That did it…we decided to upgrade and paint the cupboards, drawers, and cabinet doors.

Step 1: The Cabinets
First, evaluate your kitchen. Note what you like and what you want to change.
Our kitchen had plenty of cupboard space, so we didn’t need a complete remodel. However, it needed a refresh.
We considered painting the cabinets to brighten the space.
You can style your farmhouse kitchen cabinets in many ways. For a classic look, choose wooden or beadboard cabinets. We recommend white or off-white for beadboard cabinets.
White cabinets are ideal for a modern farmhouse style, especially when matched with the right hardware and countertops.

Simply Paint or Add Interest
In the beginning, we were just going to paint the cupboards (inside and out), the drawers, and the cabinet doors.
But our doors were quite large and just plain flat surfaces. With this in mind, we kicked around the idea of adding some type of detail that would add more of the farmhouse look that we wanted.
In a smaller area with narrower cabinets, simply painting the doors, cupboards, and drawers will help you achieve a fantastic farmhouse feel and look.
Simply painting is the fastest way to go.
Beadboard Panels
Since our doors were wider, we decided to go with an added white beadboard panel and cove trim to give a beautiful new look.
We used the 4×8-foot sheets of beadboard paneling for the cabinet doors.
This extra detail gives the cabinets the perfect warm and cozy look of a cottage-style kitchen.
Classic white cabinets paired with wooden flooring add warmth and charm to the kitchen space. The natural light reflects best on the white upper cabinets. The entire kitchen is much brighter.

We did not add the raised beadboard panels to the drawers. These were just painted with two coats of an interior semi-gloss enamel latex paint.
Beadboard panels are a simple way to get started on your remodel project. A beadboard is easier to keep clean when installed vertically as compared to a shiplap backsplash, which is normally installed horizontally.
Pro Tip: Interior Semi-Gloss Enamel Latex Paint is durable and easy to keep clean, plus latex paint is easy to clean up afterward.
How to Remodel the Cabinets:
Here is a step-by-step guide on how to remodel the cabinets:
- Unscrew the kitchen cabinet doors and remove all hinges and pulls.
- Buy white or just a shade off from white latex enamel paint. We opted for a semi-gloss for ease of wiping down and cleaning the final kitchen doors and cabinets. The semi-gloss paint gives the cabinets a fresh look plus a durable finish.
- Paint the cupboards and drawers and let them dry for at least one full day.
- If adding the beadboard raised panels, then cut the 4×8-foot sheet of beadboard paneling to the size needed for each door.
- Glue the beadboard sections to each cabinet door.
- Cut cove trim to fit over each beadboard edge.
- Read the pro tip below for further instructions on adding the cove trim.
- Staple or nail with small finish nails.
- Paint the doors and let them dry for over 24 hours or until dry to the touch, and then wait for 12 more hours.
- Make sure the temperature stays above 60 degrees to help the paint dry completely.
- We gave our cabinets’ doors three coats of paint on the outside surface. Two coats of paint on the interior cupboards and drawers.
- Install black or antique bronze pulls on the white cabinets. Black cabinet pulls are an easy way to add a classy and modern touch to your farmhouse-style kitchen. We opted for antique brass knobs since we already had antique drawer pulls.
- Replace the hinges and the knobs, making sure you can get your fingers around the knobs easily, as you must account for the increased depth of the beadboard panels when resetting the pulls.
If your pull projections are long enough, use longer screws for the added depth of the beadboard panel.
We learned this the hard way. When we tried to reset the knobs, we found that the cove trim we added made it hard to grip the pulls.
To fix this, we bought new cabinet pulls with longer projections, and it worked.
We found the correct size cabinet pull neck or stem on Amazon. GlideRite Cabinet Pulls seems to have knobs and pulls with longer projection or stems.
Pro Tip on Adding Cove Trim:
We added details to our plain cabinet doors using beadboard panels.
We cut the panels to leave a 1 and 3/4 inch border from the door’s edge and glued them onto the doors.
After the glue dried, we added decorative cove trim to cover the edges of the beadboard. The steps were as follows:
- Ran the trim through a planer so it would fit over the beadboard edges.
- Mitered the corners for a neat joint.
- Then, we cut the trim to fit each side,
- And, finally we glued and nailed it in place.
We filled the nail holes and painted everything with white semi-gloss interior latex paint.
Step 2: Beadboard Backsplash
To add contrast, we opted for a wooden beadboard backsplash. Beadboard paneling is an easy, inexpensive way to give your kitchen a modern farmhouse-style look.
Beadboard has been popular in kitchens for over a century and still hasn’t lost its popularity.
Pro-Tip: We opted to use the real beadboard boards instead of the 4×8-foot sheets of lightweight paneling.
We lightly sanded the beadboard to remove any rough spots. The beadboard panels were then stained with golden oak stain and were sealed with urethane.


So this is the perfect fix for your farmhouse kitchen remodeled look, as the kitchen appears clean and spacious.

Installing a Beadboard Backsplash
- Measure the wall area that needs to be covered. Measure the total length from the bottom of your cabinets to the counter. You will need shorter beadboard pieces for some areas, while you may have to cover the entire wall in some cases, for instance, behind the stove. If the cabinets are of different heights, measure them too.
- Measure and prepare the trim. Due to the different lengths, you will have to trim the backsplash at each edge.
- You can decide how to stain and finish according to your preference.
- Next, head over to the Home Depot shop or your local lumber yard to buy your beadboard sheets (for the door panels) and beadboard packages for the backsplash.
- Cut them to fit outlets and sockets. The beadboard paneling is cut to fit any other openings or jogs in your walls.
- Hold your individual pieces where they need to go and nail in place. We used a nail gun to secure them to the wall. Glue is not a practical option, as it would ruin your original wall and create a problem if you ever want to switch back to your old kitchen.
- Lastly, apply the caulk. Caulking is an important step, as you need to seal the small gaps and the corners to prevent leaks.
Additional Note: We made the upper cabinet above the sink smaller to give you more headroom. This change adds interest to the sink area and breaks up the long counter’s horizontal line.
We did this by shortening the cabinet doors and removing one shelf. This reduced space but increased headroom over the sink!
If you can’t add bead boards to your cabinets, try using beadboard-look wallpaper as a temporary upgrade. It’s a nice improvement at a lower cost.
Step 3: Stone or Formica Countertop
The third step is to add a stone countertop that complements the white cabinets and wooden beadboard backsplashes.
Stone countertops are both practical and elegant, adding a classic look and value to your home.
If you prefer not to use natural stone or marble, consider the new Formica options available. Some Formica patterns are beautiful and mimic the appearance of natural stone, quartz, and marble. We chose Formica and love it! It’s becoming popular again!
For neutral colors, you can pick a light-colored countertop to balance the wooden beadboard backsplash and old wooden floor, making the kitchen feel larger.
Alternatively, you can match the colors of the white cabinets, natural beadboard backsplash, and black appliances with a countertop in various neutral shades. We selected granite-looking browns and tans, and it looks fantastic!

Step 4: Copper Lighting
Lastly, add copper lighting for the perfect rustic farmhouse vibe in the kitchen. These lamps are a modern-day pick with a vintage outlook. Especially take a look at the Thomas Edison Vintage Light bulbs! Copper lights reflect perfectly on the white cabinets, wooden beadboard backsplash, and Formica countertop.
Thomas Edison Vintage LED Light …… {i love these!}

Final Thought on Farmhouse Kitchen Remodel Ideas
There are a number of ways and ideas to remodel your kitchen for a rustic farmhouse vibe. We remodeled our kitchen using the 4 DIY steps mentioned above.
You can add more twists and colors to your kitchen if you want. Let us know how your kitchen turned out!